Beranda
/ To Fix Sink Leaking - How To Fix A Leaking Sink Stopper Old House Journal Magazine - A leaking handle is normally caused by a damaged o ring inside the.
To Fix Sink Leaking - How To Fix A Leaking Sink Stopper Old House Journal Magazine - A leaking handle is normally caused by a damaged o ring inside the.
To Fix Sink Leaking - How To Fix A Leaking Sink Stopper Old House Journal Magazine - A leaking handle is normally caused by a damaged o ring inside the.. Removal, preparation and replacement of a basket strainer and repair of a punctured stainless steel sink using jb weld two part epoxy. Unless the sink has been installed perfectly, you may well find that water leaks around this seam, spilling water onto the floor inside the sink base cabinet. To do this you will need to find the stopcock or the isolation valves, which are usually situated underneath the sink. You open the sink cupboard door and oww!!! Apply epoxy putty to each of the holes you find by spreading it liberally on the underside of the sink with a putty knife.
Removal, preparation and replacement of a basket strainer and repair of a punctured stainless steel sink using jb weld two part epoxy. A drain leak is the most common one, and it's fairly easy to locate. If no plumbers putty was used when installing the drain outlet flange in the sink, this is another reason it may be leaking. To do this you will need to find the stopcock or the isolation valves, which are usually situated underneath the sink. There should be no leaks and all should be good.
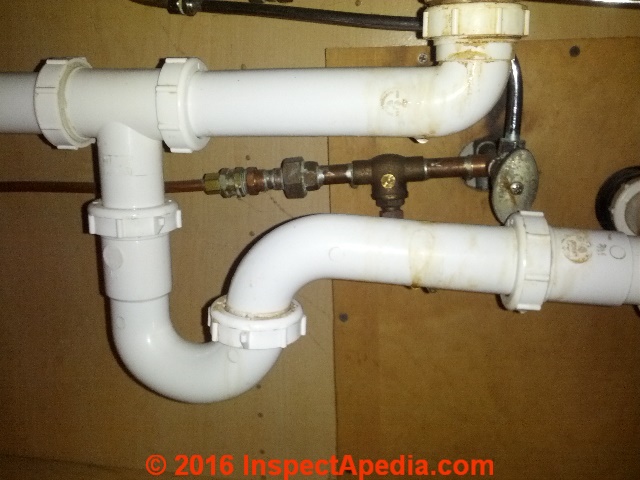
How To Repair A Leaky Sink Strainer Drain from inspectapedia.com You can search google for parts to fix your water supply valve. Removal, preparation and replacement of a basket strainer and repair of a punctured stainless steel sink using jb weld two part epoxy. If there's no valve, turn off the water supply for your whole house. If the leak is at the nut of the hose, get a plumber's wrench and snug the fitting to see if that addresses the issue. It can be directly under the faucet or the handles. Determine which side of your faucet is leaking by shutting off the water supply valves one at a time. Turn on the faucet and leave open to allow the remaining water in the line to empty into the sink. How much does it cost to fix a leaking pipe?
It can be directly under the faucet or the handles.
This must be determined early on to resolve the issue. Kitchen sink leaking from drain 5 min easy fix you can diy a simple fix save some money on a service call and do it yourself with just an adjustable wrench this is usually caused by a bad seal between the sink and drain use an adjustable wrench and disconnect the pipe from the drain and then remove the drain and seal. It can be directly under the faucet or the handles. An epoxy putty can be applied over the source of the leak to temporarily seal it. Fill your sink with water after you plug it with the drain cover. How much does it cost to fix a leaking pipe? To locate the leak, wipe away any water that remained from earlier leaks. Before you fix your leaky faucet, you must turn off the water at the supply. However, the putty can be too thin to start with, or it might dry out over time. Determine which side of your faucet is leaking by shutting off the water supply valves one at a time. Underneath the sink, check where the leak comes from. Turn on the faucet and pull out the spray head. The annoying drip of a leaky faucet handle can cause higher water bills and make an irritating dripping noise.
A leaking handle is normally caused by a damaged o ring inside the. Here are the parts you will need to fix water supply kitchen sink leaking in cabinet: If the leak doesn't stop after the first valve is turned off, it's the other line that's leaking. Most pipes under the sink can be temporarily repaired with epoxy putty, but a large drain pipe leak needs a clamp and patch kit. Ignoring minor leaks can waste up to three gallons of water every day and can also lead to permanent water stains and rot under your sink.
Pin On Ideas from i.pinimg.com Fill your sink with water after you plug it with the drain cover. Check all the pipes underneath the sink, including the cold and hot tap feeds, for any signs of drips or moisture. A drain is usually sealed with plumber's putty to prevent further leaks. If no plumbers putty was used when installing the drain outlet flange in the sink, this is another reason it may be leaking. You can choose any of the above options to fix the leaking pipe. Drain the water from the damaged line and ensure that the area to be patched is clean and dry so that the epoxy will properly adhere to the pipe. However, calling a plumber can be expensive. If there are loose compression nuts, then tightening them might be how to fix that leak under the kitchen sink.
Getting the valve seat cleaned by a professional plumber regularly is a great way to prevent corrosion and a leak.
Good job, you have fixed your leak! Wait for the cure time specified on the epoxy label before testing the sink. If the leak doesn't stop after the first valve is turned off, it's the other line that's leaking. Make sure the slide nut is tightly screwed into the spray head. Here are the parts you will need to fix water supply kitchen sink leaking in cabinet: You can choose any of the above options to fix the leaking pipe. If there aren't individual shutoff valves under the sink, shut off the water supply for the house. Before you fix your leaky faucet, you must turn off the water at the supply. Kitchen sink leaking from drain 5 min easy fix you can diy a simple fix save some money on a service call and do it yourself with just an adjustable wrench this is usually caused by a bad seal between the sink and drain use an adjustable wrench and disconnect the pipe from the drain and then remove the drain and seal. To locate the leak, wipe away any water that remained from earlier leaks. After you've removed the valve stems, take them to the hardware store. Luckily, it's quite an easy problem to fix yourself. Turn on the faucet and pull out the spray head.
If there's no valve, turn off the water supply for your whole house. This first is the quick fix; If the leak doesn't stop after the first valve is turned off, it's the other line that's leaking. This makes an undermount kitchen sink particularly susceptible to leaking around the recessed edge of the sink—the seam where the top lip of the sink meets the underside of the countertop. Then unplug the sink and look underneath to see where the leak is coming from (you may need a flashlight for this.)
Male Plumber Working Fix Leaking Sink Home Bathroom Stock Photo Image By C Monkeybusiness 355352428 from st3.depositphotos.com This makes an undermount kitchen sink particularly susceptible to leaking around the recessed edge of the sink—the seam where the top lip of the sink meets the underside of the countertop. Apply epoxy putty to each of the holes you find by spreading it liberally on the underside of the sink with a putty knife. Good job, you have fixed your leak! There should be no leaks and all should be good. To do this you will need to find the stopcock or the isolation valves, which are usually situated underneath the sink. The metal sink flange that sits directly inside the sink drain is typically sealed around the top with plumber's. Once you determine which side is leaking, turn off both supply valves. Fill the sink with water and determine where your particular leak is located.
Before you fix your leaky faucet, you must turn off the water at the supply.
After you've removed the valve stems, take them to the hardware store. It can be directly under the faucet or the handles. Make sure the slide nut is tightly screwed into the spray head. Underneath the sink, check where the leak comes from. Insert a sink stopper or cover the sink opening with a towel to prevent tools from falling down the drain. Photos 1 and 2 show how to do the fix a leaking faucet repair. Complete the following steps to make sure bathroom sink drain leaking around threads problem is solved once and for all: If there's no valve, turn off the water supply for your whole house. Once you determine which side is leaking, turn off both supply valves. An epoxy putty can be applied over the source of the leak to temporarily seal it. Determine which side of your faucet is leaking by shutting off the water supply valves one at a time. Check for leaks, then push the trigger and check again. Wait for the cure time specified on the epoxy label before testing the sink.